|
|
Albas |
A Brief Primer on Miniature
Rose Breeding In a discussion on the Internet, someone asked: "I've yet to have the roses on my minis set (seed), which annoys me because I'd like to grow some minis from scratch. (I tend to move every few years and minis are easier to transport than full-sized hybrid teas in twenty-gallon containers.) I've heard minis have some fertility problems; would this be in the pollen or the pistils? Are there any minis which aren't so fertility-impaired? Does anyone have any tips on increasing the fertility of minis?"
·
'Sequoia Gold': Best used as a seed parent, gives some pollen.
Produces some very good compact plants with good coloring. Through the history of breeding Miniatures, it has been discovered that a few Floribundas have been very useful as parents, for two major reasons. First, they help impart hybrid vigor to their offspring, and secondly, they produce seed in larger quantities than the Miniature seed parents, making it possible to make more rapid progress in the breeding program. With the exception of a few good Miniature seed varieties, most of the Miniatures produce only a few seeds per hip and often the germination is poor, thus slowing the rate of progress. Also, since miniaturism behaves (generally) as a dominant trait, then the choice of seed parent matters little as far as obtaining Miniature progeny is concerned. In most instances, the pollen from a Miniature when placed on any large shrub will result in a high percentage of Miniature offspring. This varies depending on the choice of seed parent, but this has been found to be true in general. In fact, in Ralph Moore's pioneer work with Miniatures, the seed parent was often a large Rambler descended from R. wichuraiana that produces canes up to 20 feet long! (See "0-47-19") 'Tiny Flame' from 1969, and 'Trinket' from 1965 are both crested using Miniature pollen on this Rambler parent, and yet both of them grow no taller then 10 inches tall!
'Little Darling' is one of the Floribundas that is in the background of many of the modern Miniatures and is still very much worth using. (Best used as a seed parent, but very capable as a pollen parent also) 'Little Darling', when pollinated with Miniatures pollen will produce many Miniature offspring. There are no fewer than 163 named varieties bred from 'Little Darling', the vast majority of which are Miniatures! Although this is an older variety, it is undoubtedly still well worth using as a parent in combination with some of the newer Miniatures. I suspect it is capable of creating great things if bred with some of the new Minis. These comments about 'Little Darling' apply to the Floribundas 'Gold Badge' and 'Orangeade' as well, both of which have played a significant role in the breeding of modern Miniatures. Although there are very few truly good seed parent varieties, there are quite a few excellent pollen parents to choose from. Miniatures that have been frequently used as pollen parents include: 'Little Chief', 'Cherry Magic', 'Fire Princess', 'Little Buckaroo', 'Magic Wand', 'New Penny', 'Peachy White', 'Pinstripe', 'Sheri Anne', 'Make Believe' and 'Red Fairy'. Again, this is by no means an exhaustive list, but rather is a selection of PROVEN parents still worth exploring for their sterling virtues as breeders. Once you have had a year or two to experiment with the technique of pollination, seed harvest, stratification, germination and seedling care, you may want to branch out and experiment to find out which other Miniatures work as pollen parents. (Or seed parents, for that matter) There are many fine roses available that may turn out to be excellent parents, and it may be YOU who does the pioneer work with some undiscovered parent rose! I would like to stress that if you wish to create some of your own hybrids, it is of the utmost importance to choose some of the proven breeders to work with, at least in the beginning, because there is nothing worse than ending up with mediocre results to create an impression of failure and disappointment. Choosing good parents will insure some degree of success, which will in turn, encourage you to continue with your work and learn more about the genetics of the plants you are working with. Many an amateur hybridizer has started out with only a couple of well chosen parent plants and ended up creating some of the world's most loved hybrids. I'm thinking of Dee Bennett's 'Irresistible', George Mander's magnificent 'Glowing Amber', and Sean McCann's amazing red Mini Climber, 'S.W.A.L.K.' You don't have to be very serious about growing a few of your own hybridsin order to benefit from choosing good parents. Even if your goal is just to have fun and please yourself, it is worth investing the time and energy to select breeders with a good track record. Although it is early in the year to be thinking about the coming season's hybridizing work, it is not too early to be planning which parents you wish to use, and to start acquiring those plants. As for the actual mechanical processes of hybridizing, I can give you a brief outline of procedures:
2. Label the pollinated bloom. This is very important if you wish to keep a record of what combinations produced the best results. This is not essential if you just want to grow a few seedlings and don't care what their pedigree is. For labeling, I use the small stringed tags that are often used in Antique shops for pricing China and the like. I buy boxes of 1000 of these at a time, from office supply stores. 3. Care of plants while the seed hips mature: many practiced hybridizers will tell you that they get better seed production from plants that are slightly stressed during the maturation period. In other words, they do little but water them. Some people suggest that seed bearing plants not be fertilized while seeds form. Personally, I treat all my roses the same, and if one plant gets fed, then they all do, so I'm not sure this part makes a big difference. As long as you water the plants properly and keep them free of diseases, then you will get good seeds.
4. Seed harvest: It takes a minimum of 16 weeks for rose seeds to ripen, but some varieties can take a few weeks longer. In general, I do all of my pollinating between the first week of May and the first week of July. Some seeds will be ripe by mid-September or early October, and all should be ripe by early November. As a rule, seeds are ripe enough to harvest once the hip turns color. You don't need to wait until the whole hip turns color, as long as it has started to change color. Note that some varieties like some of the Tea-Noisettes may not change color at all, so you must simply to harvest the hips after the appropriate amount of maturation time. It is important to collect the hips before a hard freeze is expected, as many modern roses cannot tolerate extreme cold exposure without damage to the seeds. If temperatures are expected to drop below about 26F, then you must collect your seeds regardless of their stage of ripeness. (Some hybridizers will tell you that they believe that it is possible to get better seed germination if the seeds are collected before the hips turn fully ripe, so you may want to harvest seeds just as soon as the hips begin to show a bit of color.) 5. Stratification: This is the stage where you remove the seeds from the hips and chill them in the fridge for 10 to 14 weeks. The seed hip must be cut open (I use a pocket knife) and the seeds removed. Ideally, none of the flesh from the hip should remain attached to the seeds, as it has germination inhibitors in it. The cleaned seeds are placed in a ziploc type sandwich bag, along with a piece of damp paper towel, and the bag is then labeled to indicate what the parents are. If you have trouble remembering how long the seeds must stay in the fridge, then put the date on the bag itself. Some hybridizers put a fungicide in with the seeds to prevent mold from forming while in the fridge. However, I do not recommend this practice if you are using the same fridge that you use for food! I no longer put any fungal inhibitor in with my seeds and I find that a bit of mold on the seeds will do no harm. Alternatively using a solution of 1 part Hydrogen Peroxide to 9 parts water in place of plain water in the bags will likely prevent most molds from forming.
6. Planting the seeds: Once the seeds have been chilled for 10 to 14 weeks, it is time to sow them. This part is very straightforward and just like sowing any other kind of seed. Flats of a good peat/perlite based potting mix are used for rose seeds, and the seeds should be planted between 1/8" and ¼" deep. Basically you want to cover them and not much more. I sow my seeds in rows, with a plastic label at the head of each row to indicate the cross. In the event that I have several hundred seeds of a particular cross then I make very wide rows or even allow 1/3 to ½ of the tray for that cross. Whatever you choose to do, be sure that they are labeled as to their identity. 7. Conditions for optimum germination: Rose seeds require a certain temperature range in order to germinate properly. The temperature of the soil should remain between 32F and 75F for ideal germination to occur. Since my flats are placed in an unheated greenhouse that has the ends open to the outdoors, they get these conditions without much fuss. While I do cover the seed flats at night if the temperature is expected to drop below 32F, I do not heat the trays (do not allow the seed trays to freeze!). I have found that a daily temperature fluctuation of 10 to 20 degrees encourages germination. Once the Spring temperatures start to increase and daytime highs go above 80F on a regular basis, germination will stop. By that point, however, most of the viable seeds will likely have germinated. Be aware that you will need to do something to prevent Damping Off in the seed trays. While you can apply a Fungicide like Captan, I prefer using less hazardous materials; make a solution of 1 part of drugstore grade Hydrogen Peroxide and 9 parts water, and use this at least every other watering to prevent Damping Off. This is a tried and true technique which many people use, and it is totally effective if used regularly. Note: rodents love rose seeds and will dig up and eat all of your seeds if they find your seed trays! I have had to make a protective wire cage (1/2 inch grid wire mesh) to enclose my seed trays, and if mice live in your work environment, you may need to protect your seeds also.
8. After germination care: Once your seedlings have emerged and have produced their first set of true leaves, you can either leave them in the flats to mature and bloom, or you can pot them up into individual pots to mature. If you plan on letting them mature in the flats, then you must sow the seeds with a minimum of one-inch spacing so the emerging seedlings do not overcrowd each other. Since I sow far too many seeds each year to allow an inch between seeds, I opt to pot up the seedlings as they develop. Since each variety tends to germinate within a similar time frame, it's easy to wait until a large number of seedlings have reached the two to three leaf stage and pot them all up in one go. Avoid waiting till they reach the four or more leaf stage, as the roots will become tangled at this point, making safe transplanting difficult. Most commercial potting soils are adequate for this phase of growth. My seedlings are first potted on into 3" plastic pots, where they spend the next 4 to 12 weeks growing. Some seedlings will bloom in a 3" pot, and so it is at this stage that I start to cull seedlings. (IE: throw out poor seedlings) Ones that are of interest and not too disease prone are potted on into one gallon pots when they have outgrown their small pot, where they remain for the rest of their first year. Some of my work involves roses that will not bloom in the first year, and I try to leave them in the gallon cans until I see a first flower. This way, I avoid wasting a lot of soil and resources on seedlings that may get thrown away in the end. Once the seedlings reach the 3" pot stage, they are cared for in pretty much the same way as you would a young plant produced from a cutting; give good nutrition and try and keep the plants Mildew and Blackspot free. Use your own judgement as to how you wish to do this; not all breeders will try and keep seedlings free from Mildew, etc., as they want to eliminate disease prone seedlings. However, I have found that a number of weak seedlings will grow out of their tendency to disease as they mature. It is my opinion that a portion of seedlings which show only the faintest glimmer of value will eventually mature to become reasonably healthy, attractive roses. If you want to start looking more deeply into the mechanics and principles of hybridizing roses, please peruse my archive of hybridizing articles. Another excellent article on hybridizing by Kitty Belendez from the Santa Clarita Rose Society.
There
have been |
|

 .
'Peachy White'; (Illustrated at left) This has been used
sparingly in breeding, but the late Harmon Saville used it way back
before Ralph Moore gave it a name. Its offspring includes 'Sunday
Brunch', '
.
'Peachy White'; (Illustrated at left) This has been used
sparingly in breeding, but the late Harmon Saville used it way back
before Ralph Moore gave it a name. Its offspring includes 'Sunday
Brunch', '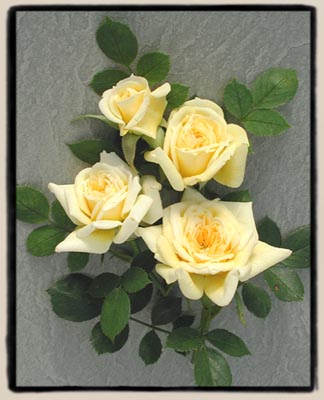
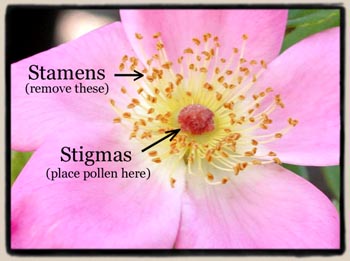 1.
Pollination: This is easy. A rose is ready to pollinate about
two days before the bloom opens. IE: you want a bud that is beginning
to unfurl, but is still at least a day away from opening completely.
Early in the morning, remove the petals and emasculate the bloom. Emasculation
involves the removal of all of the stamens (the pollen structures) so
that the bloom will not pollinate itself. The pollen you wish to use
on the female parent should be harvested the day before and allowed
to dry, either in a glass jar or in a paper envelope of some sort. To
pollinate your prepared bloom, simply dab some pollen on the stigmas
(the center structures that were surrounded by a corona of stamens)
using either a soft brush or your fingertip. I gave up on brushes and
now use my fingertip exclusively, as it is a lot easier to clean my
fingertips when changing from one variety of pollen to another than
it is to clean a brush. You can easily lick your fingertip and wipe
it clean on your shirt, whereas cleaning brushes requires washing with
soap and water, and drying the bristles.
1.
Pollination: This is easy. A rose is ready to pollinate about
two days before the bloom opens. IE: you want a bud that is beginning
to unfurl, but is still at least a day away from opening completely.
Early in the morning, remove the petals and emasculate the bloom. Emasculation
involves the removal of all of the stamens (the pollen structures) so
that the bloom will not pollinate itself. The pollen you wish to use
on the female parent should be harvested the day before and allowed
to dry, either in a glass jar or in a paper envelope of some sort. To
pollinate your prepared bloom, simply dab some pollen on the stigmas
(the center structures that were surrounded by a corona of stamens)
using either a soft brush or your fingertip. I gave up on brushes and
now use my fingertip exclusively, as it is a lot easier to clean my
fingertips when changing from one variety of pollen to another than
it is to clean a brush. You can easily lick your fingertip and wipe
it clean on your shirt, whereas cleaning brushes requires washing with
soap and water, and drying the bristles. 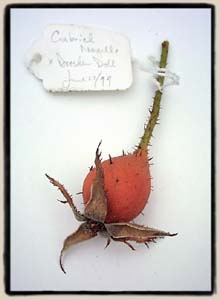 At
right: a ripe hip with the string tag label attached.
At
right: a ripe hip with the string tag label attached.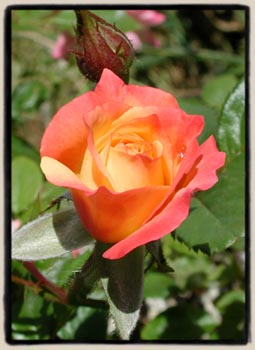 At
left: un-named first bloom seedling.
At
left: un-named first bloom seedling.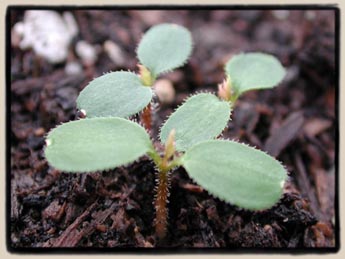 At
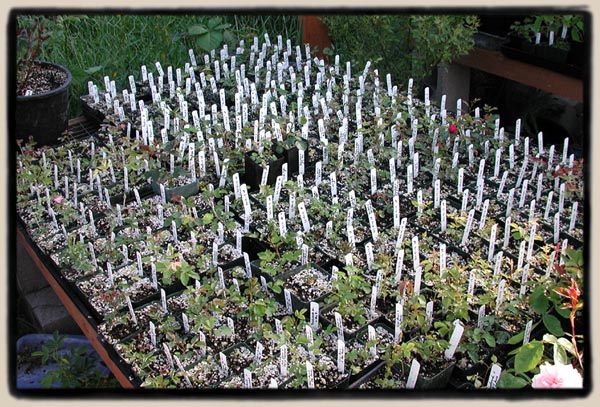
right: New seedlings emerging
At
right: New seedlings emerging