12
How to Propagate Miniature Roses
What a joy to examine those tiny buds and flowers. Who could doubt that there is a Creator of infinite omnipotence who designed those beauties.
MAXINE LAMMERTSBefore we can enjoy the flower we must grow the plant, but we are often so impatient. Sometimes the whole process seems to take too long or be too mysterious and complicated for the average gardener. This need not be so. As the following lines tell us they do grow fast, especially if we break the process into several steps and meet them one at a time.
This is the flower
that came from the bush that grew from a cutting that came from a plant
that grew from a seed
that somebody planted . . .
You may never plant a rose seed but each variety had its beginning in a seed. To make the choice new varieties which you grow in your garden, the hybridizers painstakingly hand pollinated many flowers to produce the seeds.
Cuttings of miniature roses may be readily grown, even by an amateur. Select healthy cutting material to be cut from tip growth of the desired variety. Cuttings should be 2 to 4 inches long with two or more leaves. If a number are to be made they should be dropped into a can of water to keep them fresh.
In our own propagation all cuttings are first washed in water to which several tablespoons of Clorox have been added. They are then drained and immersed for a few moments in water containing 2 tablespoons of Orthocide per gallon. Then the cuttings are removed and placed in loose piles on the cutting bench until workers can poke them into the rooting medium. The base of each cutting is dipped into a hormone rooting powder such as Rootone.
The rooting medium may be clean sand, a mixture of sand and peat, all perlite or a mixture of equal parts of peat and perlite. We prefer the latter mixture which needs no sterilization. Mix the dry materials in a clean can, bucket or wheelbarrow then add enough water and Mix to wet thoroughly. Be sure you have sufficient drainage. All our cutting beds have 1/2 inch clean fine gravel and about 3 inches of rooting medium. A plastic pot or a clean tin can with drain holes makes a fine container for a few cuttings.
Cuttings must never be allowed to dry out. For this reason we root all cuttings under mist except during the winter when rooting is slower, the weather cool and cuttings do not dry out easily. Mist nozzles about 20 inches above cutting beds operate continuously during the day (on about I hour after sunrise, off about sundown) . Our misting beds are open to the sky and sun but are protected on the sides by a 3-foot high plastic or screen glass wall protection from wind. Otherwise mist could be blown away from cuttings on the windward side. For our own propagation we have been pleased with constant misting. Our air is quite dry and waste water is not a problem. Under other conditions you may find intermittent misting more satisfactory. If rooting is done indoors in a glass house, intermittent misting would certainly be best.
A small misting unit for home growers is easily made and may be used to root many kinds of cuttings. All you need is one mist nozzle connected to an upright piece of 1/2-inch pipe (wired to a stake to hold it in position) which is connected to a water hydrant with a length of ordinary garden hose. We suggest the so-called "Florida Type" or a similar nozzle such as we use, the Thompson #215 made by Thompson Sprinkler Co., Los Angeles, Calif.
Materials needed:
1 mist nozzle connected to tipper end of 1/2-inch pipe
1 1/2-inch ell
2 pieces 1/2-inch pipe 12 to 18 inches long
1 and 1/2 pipe-to-hose fitting
1 stake (wooden or old pipe)
Connect pipe and fittings together so that nozzle is at the top of one piece of pipe and the 1/2-inch pipe-to-hose fitting is at end of other piece of pipe (see Figure 16)
Connect to garden hose and you are ready to operate. Your bench or table can be made of scrap lumber.
Mist nozzles may be turned off while cuttings are being inserted in the bed. If flats or pots are used they may be set on a table while being filled with cuttings and then set under the mist unit. A knife, clean garden label or other tool may be used to make the opening or furrow into which cuttings are poked. We use a piece of sheet metal approximately 4 inches by 6 inches with all four corners rounded for safety. Under mist, cuttings should not be inserted more than one inch deep (thus we find short cuttings an advantage) and should be thoroughly, but gently, watered to settle the medium around all cuttings.
Under good growing conditions (warm, sunny weather) miniature rose cuttings will root under mist in about three weeks. Some kinds' take a little longer, some less. When rooting has taken place (cuttings will feel tight if gently tugged) the next step is to wean them from the mist. This is done by gradually shortening the hours under mist and providing longer and longer OFF intervals during the day. With us this weaning process takes about six or seven days. Cuttings may then be removed and potted or allowed to stay in cutting bench or flat until they can be potted.
I
f mist is not provided cuttings must be watered quite often all during the rooting process and some shading is very helpful. Cutting losses will usually be much higher and some varieties will be more difficult to root.
Still another method sometimes used in rooting cuttings is to slip the pot or can into a plastic bag which extends above the cuttings high enough to be tightly closed with a rubber band or a twist tie. Support the bag top with a stick or wire bow which can be made from an old coat hanger. Or the plastic bag may be slipped on from the top and tied around the can. For larger quantities of cuttings a nursery flat, including wood or wire bows for support, may be completely encased with a sheet of polyethylene film. When planted, cuttings should be thoroughly watered before covering. Little or no added water will be needed while cuttings are rooting.
Figure 16. Home misting unit for propagating miniature roses from cuttings
Rooted cuttings are usually first potted into 2 and 1/4-inch or 3 inch plastic or clay pots using the potting soil mix recommended earlier. When potted they may be set into a nursery flat or other tray for easy handling. Water plants thoroughly as each flat is filled and again after pots are set on the greenhouse bench or other growing area. When plants become well rooted and large enough they may be sold or planted out. If desired they may be moved into larger pots or other containers for growing.
By this time your cutting grown miniature rose should be blooming freely and we are at the point where We admire the flower and say, "How fast they grow!"
Climbers are started and grown the same way but when potting up it is usually better to start with a 3 inch pot.
Figure 17. Budding a miniature rose
Growing a miniature tree rose is a little more involved and usually takes extra skill, attention, and time. Step by step the growing of a miniature tree rose plant as developed through our research is is follows (see Figures 17, 18, 19) :
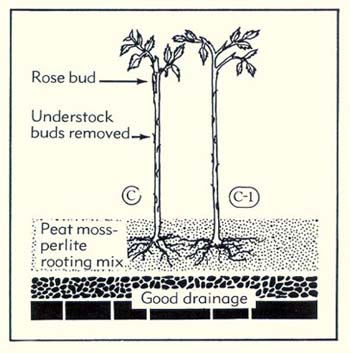
METHOD 1: Budding eyes of desired varieties are inserted along the growing branch (or cane) of a selected understock variety while yet attached to the plant. Each bud is tied with a rubber budding strip. We grow most of these as 10 inch standards which means that to allow 2 inches in the ground and a 10 inch stem above ground we need 12 inches from base of cutting to the bud. Two buds may be used but we feel that a single bud carefully pinched and trained makes a more satisfactory plant. Buds are placed along the understock cane at intervals of approximately 15 to 18 inches. As soon as buds have "taken" these canes are severed from the plant and made into cuttings. All eyes below the bud are removed with a sharp knife to prevent suckering. The understock we use is known as 'Pink Clouds' and grows much like R. odorata understock or R. multiflora It originated here as a seedling 'Oakington Ruby' (miniature) X multiflora. See Modern Roses VI.
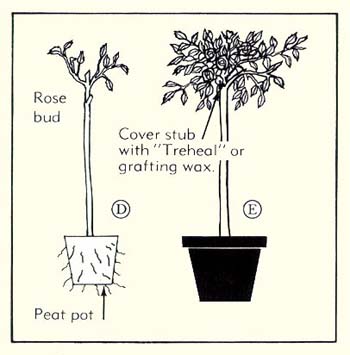
Cuttings are now inserted into the rooting medium (usually under mist) and when rooted are potted into 2 and 1/4inch round peat pots. The "nurse" tops (from the eyes above the bud) are allowed to grow until the rooted cuttings are well established in the peat pots. At this stage we move plants into 5 inch pots (clay or plastic) . The nurse top is cut back and as the budded eye grows it is pinched several times to form a new well rounded top. Flowers are usually kept off to give more strength to the developing head. If possible the stub above the bud should stay on until the top is well grown, then cut off and sealed with a pruning or grafting compound such as "Treeheal" made by the Flintcoat Co. and available from seed and garden stores.
Figure 18. Budding a miniature tree rose
Advantages of this method are: (1) good straight trunk of uniform height; (2) well formed head; (3) fully established roots in pot enables sale or transplanting all year, not just during bare root season.
METHOD 2: This method eliminates the need for budding, but only certain varieties lend themselves to, this method. It is necessary to have sufficient stock plants of these varieties from which full length cuttings can be selected.
Figure 19. Budded miniature tree rose
Use cutting wood approximately 1/4 inch (lead pencil thickness) in diameter. A small head or top should already be formed at top of cutting. After the cutting has been selected and removed from the parent plant, trim and shape the head, leaving as much foliage on as possible. (See Figure 19.) Measure down from where the head starts to branch, then make a new cut for the base of the cutting. To make a finished miniature on a 10 inch trunk, the stem or trunk should measure 12 inches. This allows for two inches of the trunk which will go into the soil. Carefully remove all eyes below the head as suggested in the first method. Immerse cuttings in a Captan (Orthocide) solution. Dust the base of each cutting with Rootone (hormone) powder before sticking it into the rooting bench or container. We mist the cuttings as needed until rooting occurs. Then they are transplanted as suggested for budded cuttings.
Advantages are the same in this method as in Method Number One. Disadvantages are: limited propagation material; extended time over which a number of cuttings must be taken; and difficulty of rooting certain varieties.
During the past two seasons I have hastened the rooting process by adapting a wounding process to the base of these cuttings. Immediately after making the cuttings I wound the base of each of them by cutting in several vertical slits. I invented a simple, inexpensive hand tool which does this job quickly and accurately. I have applied for a patent for this tool and it is now available through General Bionomics, Santa Rosa, California, or directly from Sequoia Nursery, Visalia, California. Price: $3.25. (Calif. customers add 13c sales tax) . This tool, the "Moore Multi-Rooter," is now being used in horticulture classes at the University of California, Davis, Calif., and at Cal-Poly, San Luis Obispo, Calif.
It is illegal to propagate any patented rose, large or small, without permission from the patent owner. The many varieties which have not been patented and those on which the patent has expired, may be freely propagated with no restrictions.
Return to Table of Contents
Back to Old Garden Roses and Beyond


