|
Welcome
to the June 2001 edition of my web site! This month's article is by
Mel Hulse who shares his technique for propagting roses. Now is the
time to start taking cuttings for propagation! For
tips on rose culture, pruning, propagation and history, see "Other
resources on this site". To return to this page, click on the
"thorn icon" in the margin at left. Articles from the previous
months are archived and can be viewed by clicking on the listings in
the left margin. If you wish to buy roses, please visit my sponsor,
The Uncommon Rose. Thanks!
 The
Rose Rustler's Toolkit The
Rose Rustler's Toolkit
by Mel Hulse
Volunteer Maintenance Director; San Jose Heritage Rose Garden
Rose
rustling is great fun! Whether admired in a bouquet, a friend's garden,
or found on a Sunday drive, knowing that you can clone the rose that
takes your fancy expands your love of your rose growing hobby. Hardwood
rooting is a classic amateur method of propagation, but is available
only in the winter when you can't see most roses bloom. Bud grafting
requires ready root stock and is mostly suited to professionals and
experienced amateurs. Softwood rooting is available when you see the
rose blooming. I have had the good fortune in turning softwood cuttings
into growing bushes planted the San Jose Heritage Rose Garden and others.
I've started 1,000s of cuttings with near 100% success when cuttings
meet the specs I'm giving you and good success with less select cuttings.
Remember that all roses started out as seedlings on their own roots
so grafting is not essential to their growth. Old Garden Roses, English
Roses, Shrubs, and Miniatures are generally good candidates for rooting
cuttings because most grow vigorously on their own roots. Most modern
roses such as Hybrid Teas and Floribundas are sold budded onto rootstock.
Most newer ones grow well on their own roots; a few do not. A small
number of old varieties, such as Spinosissimas and some other roses
with dense prickles as well as a few modern roses, are difficult to
propagate and may take many tries to gain success. Please remember that
asexual reproduction of roses still under patent protection (now 20
years) is illegal, especially if for sale. This technique stresses three
goals - Simplicity, successful rooting of your softwood cuttings, and
ease of transfer of the rooted cutting to your garden.
EQUIPMENT
AND SUPPLIES:
* A very bright interior window ledge or table in front of the window
with no direct sun. I am having success outside under a covered, shaded
deck in our warmer climate (overnight temperature above 45 degrees).
* One gallon ZipLock type storage bag(s).
* Bypass shears.
* A very sharp pocket, paring, or budding knife, preferably carbon steel.
* 1 gallon or more container of water.
* Potting soil. For bags, you want a mixture that holds together well
when damp. Ingredients should be of fairly fine texture. In the West,
Supersoil works well. Shultz Potting Soil with Fertilizer from Walmart
And Whitney Farms Seed Starting Mix work also.
* Spray bottle of about 16 oz. capacity. Put in 1/8 teaspoon Miracle
Gro for Roses, K-Mart's cheaper clone or Peter's 20-20-20, 1/8 teaspoon
baking soda to prevent fungus, and a few drops of dishwashing liquid
to make it cling. Fill with water. The mix should suds a little when
shaken. If not, add more dishwashing liquid. If you make a gallon, use
a teaspoon each of fertilizer and baking soda.
* Rooting powder or liquid. Useful, but not essential. I prefer liquid
Dip 'n' Grow because I can vary the strength.
* A garden marking pen and labels. Home Depot sells a small kit of 40
labels and the right kind of marking pen.
* Notebook and pen with waterproof ink.
* 10" wooden skewers of the type used for shish ke-bab.
* 1-gallon plastic planting pots. You know; those black things!
* 14" saucers. Cheap, plastic terracotta color ones from Home Depot
work fine.
* Patience!
 SELECTING
THE CUTTING: SELECTING
THE CUTTING:
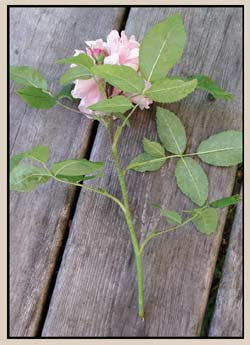
The ideal in order of priority:
1. A stem with a spent flower is desirable. A stem with a flower bud
with no color showing is too young. 2. Include four - 5 leaflet leaves
on the stem. 5 leaves are acceptable. Fit in the baggie governs the
length. Note. For this and the remainder of this article, "5 leaflet
leaves" includes varieties that have 7 or more leaflet leaves.
3. A heel at the bottom. This is the place where a branching cane grows
out of a main cane. Cut right up against the main cane. Faulting this,
cut immediately below the bottom bud.
4. Soft, flexible wood, 1/4" in diameter or less.
5. Disease/virus free. 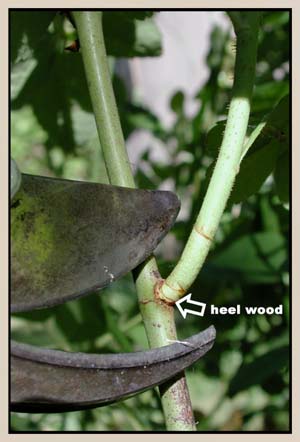
At
left: An ideal cutting.
For
climbers that are sports of a bush form of the same rose. Use the end
of a climbing cane rather than a lateral even though it has no bloom
on the end. Use of a lateral may cause the climber to revert to the
bush form. Nature doesn't always give you the ideal and all of the above
guidelines can be broken if necessary, but try for the ideal. Keep the
cutting damp until ready to use. Wrap loosely with a wet paper towel
and put in a plastic bag. Keep cool. Refrigerate, if possible. Use within
a week.
At
right: I always try to take the new years growth right down
to where it attaches to last years cane. The heel wood is a part of
the cane that roots most easily.
PREPARING
THE BAG:
* Write the rose name or found location and date
on a new baggie with the gardening pen. Note all known information about
the rose with date in your notebook. If you are more diligent than I,
you can keep notes on your cuttings' progress as a reference for future
propagation efforts.
* Fold the zipper part down a couple of inches to keep the zip groves
clean. Put 3 cups of potting mix into the bag. No more.
* Pour a scant cup of water into the bag. Grab the bag above the potting
soil and knead the water into the soil. While doing this, tuck the bottom
corners of the bag under the soil. The mass should look like a ball.
When thoroughly mixed, test for enough water. - If water leaks out when
the bag is inverted, and squeezed it is too wet. Squeeze out the excess
water. - Put the bag top upon a flat surface. Press the top of the soil
down to form a 1+" deep, round pancake. Stick a finger into the soil
in the middle. If the soil breaks apart, you need to add water and recheck.
* Set aside on a flat surface.
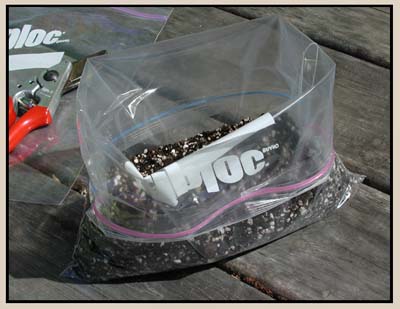
At
left: The baggie filled with soil and the sides rolled down.
PREPARE
AND INSERT THE CUTTING:
* Snip off the stem 1/2" above the top-most 5-leaflet
leaf. Strip off the bottom leaves leaving 1 large or 2 regular 5-leaflet
leaves. These are required to produce a hormone during rooting and to
start growth. If the cutting does not terminate in a heel, locate the
lowest bud eye on the cutting--make a cut straight across directly below
the lowest bud eye (the "bud eye" is the swelling right above the junction
of the leaf with the cane.) Here are several guidelines for unusual
cases: 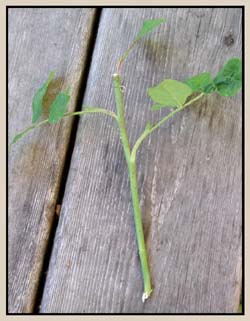
* Lateral stems with mature leaves off the main cutting cane. Cut (don't
try to break) these off very close to the cane. The bud eye they came
from can still produce more breaks.
* Broken (opening) lateral buds with immature leaves on the upper part
of the cutting. Leave the highest one alone. It will grow. Carefully
cut off any others with your shears.
* Very small or broken leaves at the top. Leave 3 leaves. Break off
the thorns on the bottom inch of the cane being careful not to disturb
any minute buds. Note that there are many tiny buds above a heel. Carve
a shallow cut through the bark from 1/2 - 3/4" above the bottom of the
cutting to the end of the cutting on the opposite side from a bud. Avoid
cutting any bud eyes.
At
right: A typical cutting, about 6 inches long with bottom leaves
trimmed off.
The
cutting will form a whitish callus along this score and along the cut
end of the cane. This is where roots emerge.
Dip
the bottom inch of the cutting in liquid rooting compound or for powdered
rooting compound, water and then the compound and knock off any excess.
Place the cutting in the hole you made with your finger with the leaves
running the same way as the zip grooves at the top of the bag. Press
the potting soil around the cutting. It is best if the cane is slanted
from one end of the bag toward the other. Be careful in this process
to avoid letting thorns puncture a hole in the bag. If this happens,
use another bag. 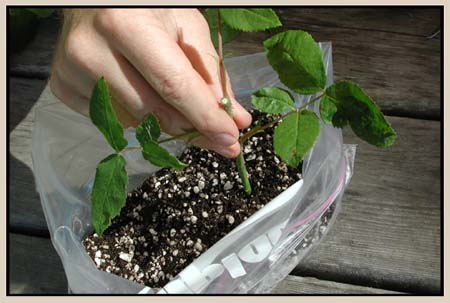 Unfold
the top of the bag to be ready to close it. Spray the inside generously
with the spray bottle you prepared. If any foreign material got on the
zip groves, wash it off with the sprayer. Close the bag from both ends
toward the middle leaving an inch unclosed. Be sure you do not catch
leaflets in the zip grooves. Blow into the bag to expand it like a balloon
and zip it up completely. Put the baggie in bright, indirect light preferably
inside. Direct sun will scorch and kill the cuttings. Unfold
the top of the bag to be ready to close it. Spray the inside generously
with the spray bottle you prepared. If any foreign material got on the
zip groves, wash it off with the sprayer. Close the bag from both ends
toward the middle leaving an inch unclosed. Be sure you do not catch
leaflets in the zip grooves. Blow into the bag to expand it like a balloon
and zip it up completely. Put the baggie in bright, indirect light preferably
inside. Direct sun will scorch and kill the cuttings.
At
right: Inserting the cutting.
From
now on, handle the bag from the top. Set it down only on a hard, flat
surface (not your knee.) The idea is minimum displacement of the cane
and new roots. Note: While not recommended, it is possible to root 2
or 3 cuttings in a single bag if you are pressed for space. Sorting
out roots during potting or later planting will be a potential source
for loss. I have found that with 4 or more cuttings some usually die.
WATCH IT GROW:
Now comes the fun! Roses are very individual and perform differently.
New growth may appear in 8 days ('The Fairy') or may take over 3 months
('Belinda' with a hard cane.) Some will form a lot of roots without
breaking a bud; some will become tiny bushes in the bag with no visible
roots for some time. The presence of leaves does not mean that your
cutting has struck (taken). Stored energy in the cutting can support
much top growth, but if the cutting doesn't callous and roots don't
appear, the cutting will eventually die. Most of the care needed is
an occasional bag reinflation. The bag provides the complete humid environment
the cuttings need - a mini greenhouse. Don't worry if some of the original
leaves turn yellow and drop so long as the cane is green. Remove the
dead leaflets and any mushrooms or fungus. If the soil cracks at the
cane, gently move soil into the crack and firm it in place.  The
skewers are great tools for this. Give the inside of the bag several
shots out of your spray bottle before reinflating the bag. Some of these
dummies think they should bloom in the bag!!!! Watch carefully for buds
and nip them immediately. If you don't, you may lose the rose or set
it back months. As long as the cutting cane is green, any of the original
leaflets or new growth are still alive, or roots are apparent and vital,
your rose is alive. Don't despair! The
skewers are great tools for this. Give the inside of the bag several
shots out of your spray bottle before reinflating the bag. Some of these
dummies think they should bloom in the bag!!!! Watch carefully for buds
and nip them immediately. If you don't, you may lose the rose or set
it back months. As long as the cutting cane is green, any of the original
leaflets or new growth are still alive, or roots are apparent and vital,
your rose is alive. Don't despair!
At
left: The bags with their cuttings placed under lights. A bright
place with indirect light is also a good choice.
HARDENING:
When to open the bag? This is the tough one. Here are some conditions
that should work:
* Roots show on the bottom of the bag and you have 2 or 3 five leaflet
leaves of new growth.
* You can't see roots, but new top growth has approached the top of
the bag and is not spindly or growth lower on the cutting looks mature.
* There are strong roots on the bottom of the bag for several weeks
and a bud eye has swollen but not broken. Opening the bag to harden
the plant is the most critical time in the process. If you lose the
rose, it will probably be at this point. Be sure that you have time
to care for the rose on the day you open the bag and the day after.
It doesn't hurt to put off the "coming out" until you have time. Patience!!!
Open the bag for about one inch for about 3 hours the first day. Use
a skewer stuck through the opening and into the soil to hold the bag
vertical. Check the rose every hour. If the new growth droops or the
leaflet edges brown, close and blow up the bag, wait a few days and
try again. If the rose is unaffected by the opening, close the bag after
the 3 hours. The next day, double the opening period and the size of
the opening. Keep watching carefully. Keep up these increases each day
until the bag is completely open. Backup a step if the rose can't take
it. After the bag has been completely open a day, fold down the zip
part. Keep in place another 4 days. Give it a spray once or twice every
day.
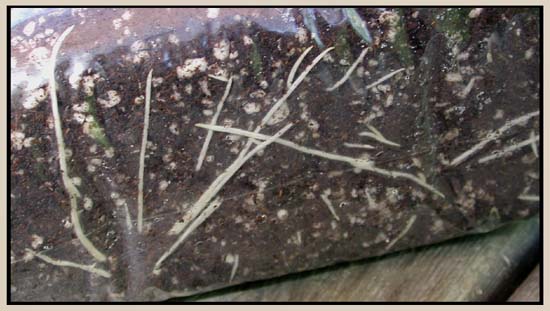
Below:
After 10 to 30 days, you should see roots forming inside the bottom
of the bag, as shown here.
POTTING
AND PLANTING YOUR TREASURE:
Now you will see the reason why I told you to tuck in the bag corners.
If possible, do this on a plastic/newspaper covered table outside. Fill
the pot one-half full with potting mix. The potting mix need not be
the type you used in the bags. Place the pot in a saucer and wet the
soil until it runs into the saucer. Indent the soil in the middle. Here's
the hard part. Holding the bag over the pot, slip your hand into the
bag under the potting soil centered under the plant. Slide the bag from
under the soil mass and your hand while keeping the potting soil root
ball as intact as possible. Slowly work the root ball and the plant
into the pot with the stem centered and at the same angle it was in
the bag.
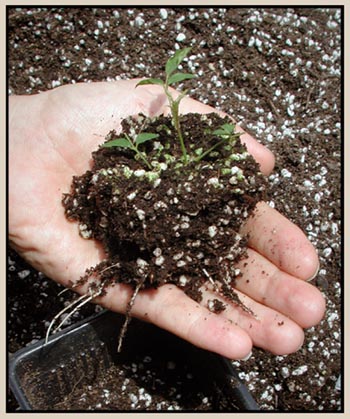 At
right: Once the root system is sufficiently developed, as it
is here, carefully remove the plant with soil intact. Be sure to cradle
the root mass carefully to avoid too much trauma. The roots are delicate
at this stage! At
right: Once the root system is sufficiently developed, as it
is here, carefully remove the plant with soil intact. Be sure to cradle
the root mass carefully to avoid too much trauma. The roots are delicate
at this stage!
Some
potting soil will break off, but don't worry. Once the mass is into
the pot, add the soil that broke off and gently firm it into place maximizing
the plant position without significant root displacement. Make a tag
with the info from the bag. Stick the skewer in the side of the pot
and hang the tag on it. Later, when you have a solid cane, you may place
the tag there, but don't block buds. Return the potted rose in its saucer
to the same location you had it while in the bag. Keep water in the
saucer to a level where some air can enter the top of the pot drain
holes. This keeps the potting soil "sweet." Leave it there about 4 days.
Your eyes will tell you when it is happy enough to move. If your weather
permits, 50's nights or above, move it outside. Start in a bright, dappled,
shaded location with a little morning sun and slowly move it during
a week or two into full sun. Depending on your climate (I'm in USDA
zone 9b, Sunset 17), you may need to move it inside at night for a while
(I don't). Your eyes should be the judge of how strong the rose is and
how fast it can progress. It ain't rocket science, just judgment and,
Hey! patience.
If
you have a lot of gallon pots with cuttings, an old plastic garbage
can lid can be a saucer to seven. After a week or so of success in full
sun, continued growth, and given warm weather, plant it in the ground
or a large container as you would any other potted rose giving regard
to the variety, vigor, and its requirements for space and sunlight.
Always plant it or place it in a larger container if roots show at the
drain holes. 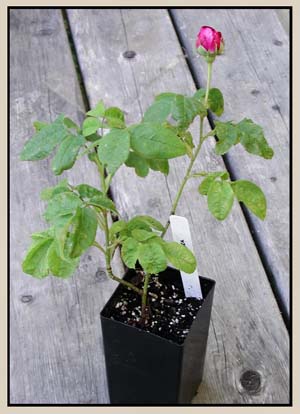 Through
all this and for the first month in the garden, make sure it gets water
every morning. All of this timing depends on watching the rose. Proceed
if the rose is growing and gaining strength, back off if it droops or
the leaves brown. And, just like teenagers, some try to flower too soon!
Pinch off buds until you have a good strong plant, at least 3 months.
(You may cheat and leave one bud to see the first bloom. But then, pinch
it off!) Through
all this and for the first month in the garden, make sure it gets water
every morning. All of this timing depends on watching the rose. Proceed
if the rose is growing and gaining strength, back off if it droops or
the leaves brown. And, just like teenagers, some try to flower too soon!
Pinch off buds until you have a good strong plant, at least 3 months.
(You may cheat and leave one bud to see the first bloom. But then, pinch
it off!)
At
left: A plant produced by the baggie method, one year after
cuttings were taken.
Fertilize
with liquid fertilizer or fish emulsion at least every other week. I've
also found that misting each morning with the fertilizer/baking soda
mix definately promotes healthy growth. Stop fertilizing at the beginning
of September in cold country; later in warmer climes. Provide extra
protection the first winter.Repeat-blooming roses will usually put forth
a first bloom in about 8 weeks. Once blooming roses won't bloom until
the next year because they bloom on old wood.
Growing
roses from cuttings is not hard. Both the process and the results are
fascinating and the roses you grow are somehow more yours to enjoy.
This paper expands on instructions in the Rose FAQ (Frequently Asked
Questions) available on the World Wide Web at: http://www.ars.org.
I acknowledge my debt to rosarian Cheryl Netter who first described
the baggy method, nurseryman friend Tom Liggett and others who provided
added details and insight. These instructions are tailored to my area
(USDA zone 9).
MelHulse@PacBell.net
May 23, 2001
This article copyright © Mel Hulse, 2001.
This
website made possible by a grant from the
Uncommon Rose

There
have been  hits on this page. WebCounter does
the stats.
hits on this page. WebCounter does
the stats.
Original
photographs and site content © Paul Barden
1996-2003
|

